"" The Blonde Bug: January 2012

Wednesday 25 January 2012

WOYWW 138


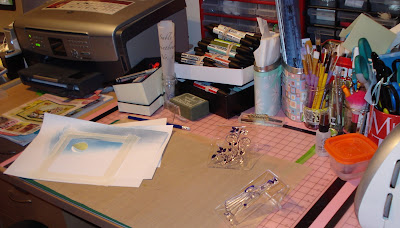
Hello everyone, heres my workspace this week . The brayered pic was for a spring like card however I had a lil mishap with some streaking so will now turn him into a Christmas card , tis all practice ! The 2 Clarity stamps are new , I've been fancying that large swirl forever , and will have a lil try at some more Angelina fibres with the lady.

Last week I was all set to cut my masks with my Cricut expression for brayering the "Kiss Technique " through. After a slow start ( which included cutting the masks from card, sadly that doesnt work as the card is to thick and you don't get the complete image ), I've had some success, I have also tried the "Kiss Technique straight onto card shapes I'd already cut and I like them to .


So you now need to tootle over to Stamping Ground where Julia and lots of other lovely crafters let you have a lil peak at their workspace . I'll leave you with a completed card from that "Kiss Technique " 


Have a great week 

p
xxx


Wednesday 18 January 2012

WOYWW 137


Where does the week go ! So if your new to this get yourself across to Julia's site Stamping Ground and see all the links for What's On Your Workspace Wednesday . It's only my second week and I was thrilled to bits with all the visits and comments I received so thank you .

Well I got my Perfect Pearls Lady card sorted I posted it to my blog if you'd like a peek .
This week my desk is a lil tidy ! I'm now working on a golfing card for a friend which I've stamped with a PaperNation stamp and I'm going to colour it with Watercolour pencils or my distress inks haven't decided yet going to have a play tomorrow .

You can see my beloved Cricut Expression on my desk I intend to have a bit of time to make some masks to brayer my backgrounds through, it just never occurred to me to brayer through a mask ! It's another brayer technique Maria Simms taught us at The Claritystamp Northwest Workshop last Sunday. I had a fab day, learnt loads and met some new friends.
So thats me, have a great week . See you next Wednesday !

p
:-)

Saturday 14 January 2012

Perfect Pearls Lady

Well another two attempts and I'm liking what I'm doing now .

So I gathered together my bits & pieces Clarity Adhesive sheets, Acetate, Archival Black Ink Pad, Clarity Stamps,  My Punched out Circle ( Waxed paper not Post It ),Perfect Pearls ( 3 colours , didnt want to complicate things anymore for myself ) , soft brushes to apply PP & Angelina Fibres Stamped image of my Lady stamp.
Next I peel off the waxed paper off one side of the Adhesive Sheet and stamp my images onto the AS. Now the Acetate goes over the top of the stamped image.Turn the image over the and remove the other piece of waxed paper add the Waxed circle over the  lampshade part of the lamp. This is so that I can keep the glow of the lamp white.

I now add my Perfect Pearls to the image, which is sticky. Iv'e mixed them with the white to give me some paler or softer tones. I coloured her shoes in with a lil of the Gold made paler with the White & did the same to make the flame in the lamp.
Once I was happy with the image I dusted it all off & cleaned the front up with kitchen roll. I then mounted the Angelina fibre lady on top . I'm going to make some more in this style this week end so I really get the technique fixed in my brain ! I have seen Barbara Gray of Clarity Stamp fame do this and just love it. Thank you to all who visit my page and have a great week end
p
xxx

Wednesday 11 January 2012

WOYWW


Well this is my first WOYWW at Stamping Ground . I do start with an organised desk, then I just seem to get more and more toys out, have about three projects on the go at once and generally have a whale of a time !
 I've been having a play with Perfect Pearls again after watching Barbara of Clarity fame inspired me , as she always does . The punch ( which is actually too large ), I just had to buy after ruining Sundays attempt at Perfect Pearls when I used a post it circle to mask the moon on Adhesive sheets ! You guessed of course that the Post It was permanently stuck to my sheet ! Hey ho what do you do , you have another go using a moon punched out of waxed paper , which is of course removable ! Any who the end result isn't quite what I'm after but I'm getting there .
So tonight I'm going to have another go and we'll see what that brings ! 
Enjoy your evening.

Thursday 5 January 2012

Miss Tanyas Birthday Card

Hello to all who are reading this, I've had a day off work and have spent a lot of my time crafting . So I'm a very happy girl . I have made a lot of toppers using Angelina Fibres & fusible film. I'll show you these later in the week. I also finished a card for my good friend Tanya and here it is.


The stamp is a Clarity Stamp called Velvet she is available in small and large I've used small here , the text stamp I sadly cant remember where I purchased it from sorry. I stamped both in Archival Black ink on Clarity White coated cardstock then embossed with detail clear powder. I coloured the lady in using Twinkling H20's , beautiful paints with lots of shimmer. I've then layered the card up using a pattened green paper and a background crackle pattern I made using Indigoblu stamp Crackleglaze background stamp which I stamped in Archival Black & embossed with detail clear. I then sponged the green & yellow inks over it. My Sentiment is typed on my Mac onto photopaper. Which I'm sure is probably cheating  but hey ho ! Anyway hope you like it . Enjoy the rest of your week x

Recipe

* Clarity Velvet stamp small
* Clarity White coated cardstock
* Twinkling H20's 2 shades of green
* Indigoblu Cracklebackground stamp
* Adirondak Lettuce inkpad & Tim Holtz Scattered Straw inkpad

Sunday 1 January 2012

Lavinias Fairy Card

I love this stamp , I Brayered the background with Big and Juicy Hydrangea , I used a Post it note moon to soften colour behind the lantern . That's Maribou feathers behind in a co ordinating Mulberry colour . The sentiment is on photo paper . This is my first post in a long time and also my first from the Blogger App on my iPhone so please bear with me . Happy New year to you all x


Recipe

* Big & Juicy Hydrangea ink pad
* Clarity White coated A6 Cardstock
* Lavinia Harietta stamp
* Pro Markers and Stickles to colour
* Maribou feathers to trim

LinkWithin

Related Posts with Thumbnails